Changes
Page history
bjoern.butzin created page: home
authored
Sep 09, 2016
by
Björn Butzin
Show whitespace changes
Inline
Side-by-side
home.markdown
View page @
3ba1e9aa
...
@@ -17,7 +17,7 @@ The following points will be covered by this tutorial:
...
@@ -17,7 +17,7 @@ The following points will be covered by this tutorial:
*
Prepared JAVA project files for Hands-on
*
Prepared JAVA project files for Hands-on
## 2. Installation of Copper Plugin for Mozilla Firefox
## 2. Installation of Copper Plugin for Mozilla Firefox


-
https://addons.mozilla.org/de/firefox/addon/copper-270430/
-
https://addons.mozilla.org/de/firefox/addon/copper-270430/
-
Click on „add to Firefox“ & Confirm Installation
-
Click on „add to Firefox“ & Confirm Installation
...
@@ -25,7 +25,6 @@ The following points will be covered by this tutorial:
...
@@ -25,7 +25,6 @@ The following points will be covered by this tutorial:
After the installation you can enter coap://host:port/resourcePath/?query=filter.
After the installation you can enter coap://host:port/resourcePath/?query=filter.
Copper will allow you to make any CoAP interaction interactively.
Copper will allow you to make any CoAP interaction interactively.


## 3. Introduction of jCoAP
## 3. Introduction of jCoAP
...
@@ -34,7 +33,7 @@ Copper will allow you to make any CoAP interaction interactively.
...
@@ -34,7 +33,7 @@ Copper will allow you to make any CoAP interaction interactively.
-
https://gitlab.amd.e-technik.uni-rostock.de/ws4d/jcoap
-
https://gitlab.amd.e-technik.uni-rostock.de/ws4d/jcoap
### Task 1 – Sequence Diagram
### Task 1 – Sequence Diagram


Server Side
Server Side


...
@@ -75,16 +74,16 @@ Client Side
...
@@ -75,16 +74,16 @@ Client Side
You can find the required files in our repository at https://gitlab.amd.e-technik.uni-rostock.de/ws4d/jcoap/tree/master/ws4d-jcoap-handsOn
You can find the required files in our repository at https://gitlab.amd.e-technik.uni-rostock.de/ws4d/jcoap/tree/master/ws4d-jcoap-handsOn
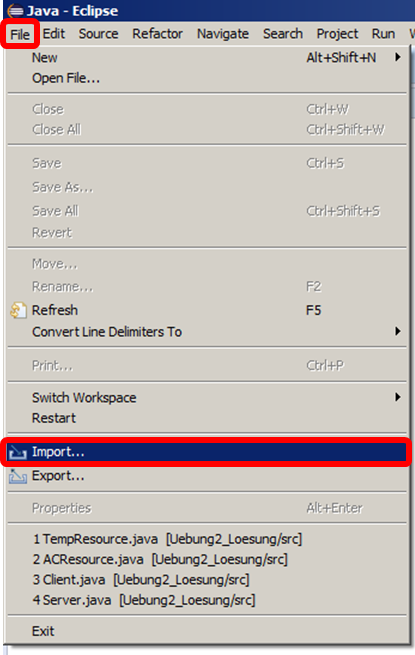
1.
File > Import
1.
File > Import

2.
General > Existing Projects ...
2.
General > Existing Projects ...
3.
Click ‚Next‘
3.
Click ‚Next‘


4.
Browse
<Select
Project
Folder
>
4.
Browse
<Select
Project
Folder
>
5.
Click ‚Finish’
5.
Click ‚Finish’


*
the resulting GUI should look like this:
*
the resulting GUI should look like this:


*
We have prepared some FIXME and TODO annotations:
*
We have prepared some FIXME and TODO annotations:
*
Just open the „Task“ view
*
Just open the „Task“ view
...
@@ -185,7 +184,7 @@ You can find the required files in our repository at https://gitlab.amd.e-techni
...
@@ -185,7 +184,7 @@ You can find the required files in our repository at https://gitlab.amd.e-techni
*
If you have written your own resources before: GET them
*
If you have written your own resources before: GET them
## 6. Task 2: Implementation of a AC control by using the CoAP-observe mechanism
## 6. Task 2: Implementation of a AC control by using the CoAP-observe mechanism


1.
Use the eventing mechanism CoAP-Observe
1.
Use the eventing mechanism CoAP-Observe
2.
Let the server notify clients every 5 seconds about a changed TemperatureResource
2.
Let the server notify clients every 5 seconds about a changed TemperatureResource
3.
Implement an Air Conditioner Resource with the path “/ACControl”, that can be set to “high”,
3.
Implement an Air Conditioner Resource with the path “/ACControl”, that can be set to “high”,
...
...
...
...
